 Translate
- Download the archive with the plugin
- Unpack the archive
- Open 3ds Max application
- To install an MZP file in 3ds Max, you can use one of the following methods
- Drag and Drop Method:
- – Simply drag the MZP file from your file explorer and drop it into the 3ds Max viewport.
- Using Menu:
- – Go to the “Scripting” menu and select “Run Script.”
- – Navigate to the location of your MZP file, select it, and press “Open.”
- The installation will be automatically started
- Follow the instructions on the screen to complete the installation
- Generate the identification file, if you are the official client and you need a new license
- In the 3ds max menu “Customize”>> “Customize User Interface”>> Category “Kstudio” choose the plugin and drag it to the Panel of the Instruments
Questions on Buying&Licensing:
How can i pay?
You can buy the software using a variety of payment methods through an online store.
The order process is protected via a secure connection and makes on-line ordering quick and safe.- Credit Card
- PayPal
- Webmoney
- Wire Transfer
- Check
- American Express
- Alipay
- Purchase Order
- Full list of Payment Methods
- The most plugins have a volume discount.
- VAT information can be found in the shopping cart.
- All prices shown here are listed in USD (United States Dollar).
- You can switch to any other currencies during the checkout process.
- You can see the exact cost of buying on the checkout page.
- Refund Policy for Kstudio products:
If you are not satisfied and unhappy with plugin or if you can’t use it for some reason,
you can request a refund within two weeks of product purchase.
We will provide refunds to any reasonable request.
If you have any problems, contact us at sales@3d-kstudio.com
Installation and Reception of License Key
Installation- Install the “Fusion“, “Sweep PRO” or free version of the plugin “Sweep Profile“
- Unpack the archive with Mouldings.zip
- Drag the “Install Sweep-Profile Shapes.mzp” into the 3ds Max viewport
- Start the plugin (Fusion or Sweep Pro) and choose the directory with shapes on the top list of the plugin
- By default mouldings are installed by path “%localappdata%/Kstudio/Sweep-Profile Shapes/”
You must be logged in to download the full version.
* Applicable to official customers onlyReceiving the License KeyRun the 3ds Max
Choose the menu-item “Activation” from the main 3ds Max menu “Project Manager” or from the plugin menu “Help”

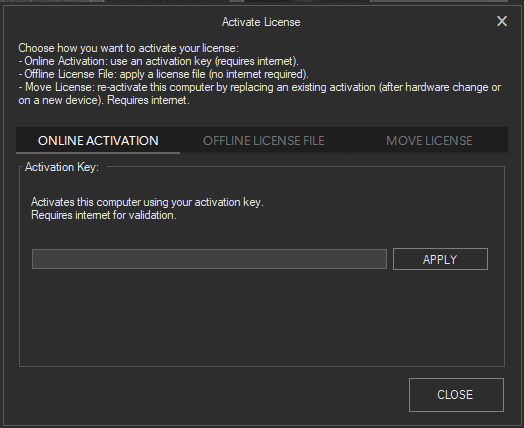
Select the most suitable activation type
- Run the 3ds Max
- Run Sweep PRO plugin
- An activation dialog will appear
Select the most suitable activation type
- Run the 3ds Max
- Create the Fusion/Spline Flow/…/Add the Modifier..
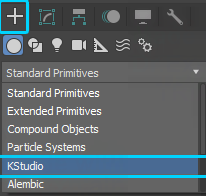
- To create an object, choose the Kstudio Category in the Create section on the Command Panel

- Create the object in the viewport and switch to the Modify tab
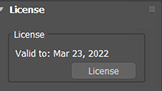
- Open the License rollout at the bottom and press the button License

- An activation dialog will appear
Select the most suitable activation type
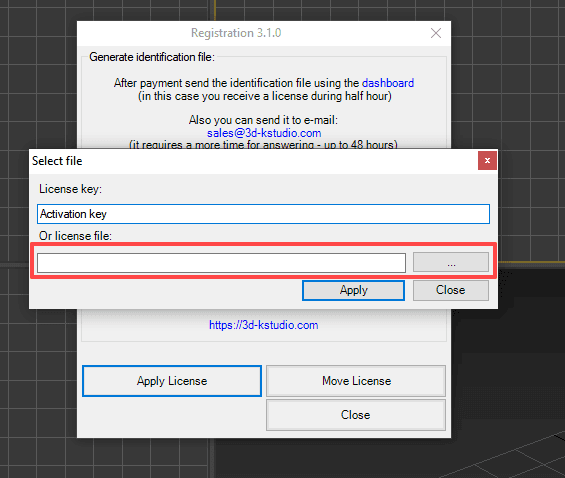
Insert the activation key received in the confirmation email and click the “Apply” button.
You can always check and manage your activation keys in your dashboard.If you move to a new computer or reinstall Windows, simply re-activate using the same key — no need to request a new one.
Each activation key can be used on one or several devices (depending on your license type).
This feature is currently available for Project Manager, Models Manager, Materials Manager, Batch Render&Relink, FilePathFinder, and Sweep PRO.
Soon it will also be extended to other plugins.Internet connection is required for activation and occasional validation.
Note: By default, the online license is activated for all new purchases.
If you are still using the old (offline) license type, you can easily switch to the online license in your dashboard.
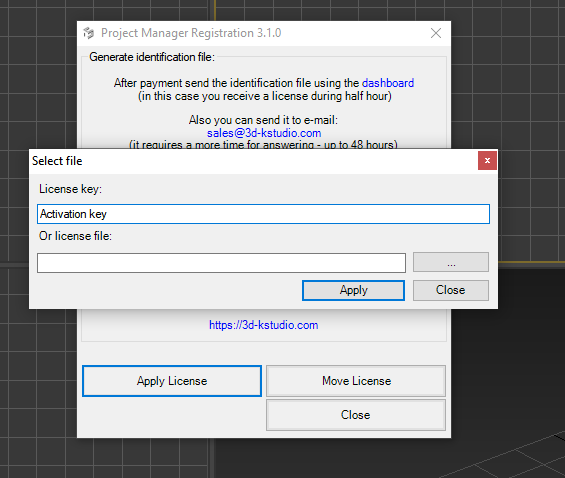
This significantly simplifies license management, especially for teams.Insert the activation key received in the letter and click the button “Apply License”

Note: Internet connection is required to use activation keys
If you have a problem with this activation type, use the second method – using identification file
You can use a single identification file to obtain licenses for various plugins.
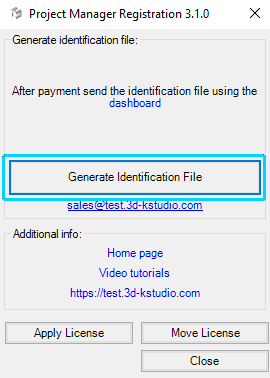
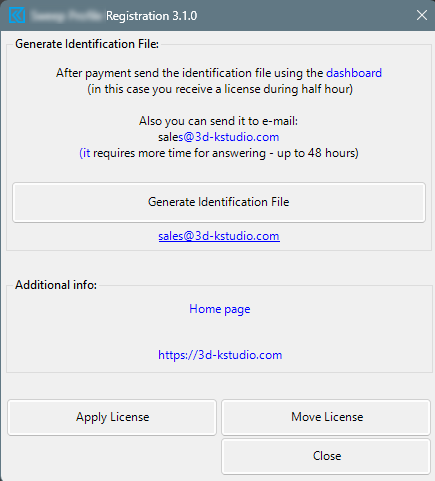
For instance, you can generate an identification file for Sweep PRO and use it also in the slot for generating a license for Spline Flow1. Press the button “Generate identification file”

2. Login to dashboard using the same email you used for purchase
3. Upload the identification file, generated in the previous step, by pressing the “Choose File” button
4. Press the button “Send”
5. Download the license key from the dashboard.
Also, you will receive a copy of your license key to an email-box
6. Press the button “Apply License” and choose the downloaded license key

Kstudio plugins are used by freelancers as well as in studios of different sizes – from several employees to hundreds.
This feature simplifies the deployment of numerous installations into a large network.
This instruction applicable only for Project Manager
I recommend paying attention to utilities such as PsExec and PowerShell – with their help you can install the 3dsMax plug-ins and apply the license keys in a batch mode.
Using:
- Download and extract the archive SilentModeInstall.zip
- Copy the ZIP archive with the full version of the plugin into one folder with “AutoInstallStart.bat”
- Open “AutoInstallStart.bat” and uncomment/add a valid path to 3dsMax.exe
- Write activation keys to the file “ActivationActivationKeys.txt”
- Run “AutoInstallStart.bat” using PsExec/PowerShell or manually on each computer
How to Distinguish Between the Full and the Demo Version You Downloaded and Installed?
Before activation, do not forget to install the full version of the plugin
(the title shouldn’t contain the word Demo)To determine if you have downloaded and installed the full version or the demo version, here are some key points to consider:
1. Activation: The demo version cannot be activated. If you have downloaded the demo version, activation will not be possible.
2. File Name: The archive containing the demo version will include the word “Demo” in its name.
3. Installation and Launch: During installation or when launching the plugin, the demo version will display the word “Demo” next to the logo.
4. Full Version: If there is no “Demo” label on the logo, but you see the “Demo” label over files, it means you have the full version which requires a license key for activation. Full VersionDemo Version
Note: Please use the latest updates for your version of 3ds Max
3ds Max Updates & Service PacksSee Also:
Does it possible to use one license on more than one computer?
Each license can be used on only one computer.
Buyers can check the number of their licenses in the dashboardHowever, a special offer is available – get one free additional license for free with your first purchase!
Volume discounts are also available for most productsIs license perpetual?
Access to the licenses is time-unlimited. All updates from version x.0 to x.5 and from version x.5 to the next major version are included.
Upgrades to new versions are available at discounts ranging from 15% to 25%; earlier upgrades yield greater discounts.
Licenses acquired less than a year prior to the launch of a new version are eligible for a complimentary upgrade.
Additionally, after upgrading all primary licenses, any Free Additional License will also be updated for free.I purchased a product, but it’s not showing up in my account. Why?
This usually happens when you log in with a different email than the one you used at checkout.
Try logging in with the email you used to buy the product.
Still stuck? Just send us your order info and we’ll help you out.How to update or transfer the license to another computer?
If you have an Online License (activation key), the transfer process is much simpler:
Install the full version of plugin on the new computer.
Run the Activation tool.Insert the activation key received in the confirmation email and click the “Apply” button.
You can always check and manage your activation keys in your dashboard.If you move to a new computer or reinstall Windows, simply re-activate using the same key — no need to request a new one.
Each activation key can be used on one or several devices (depending on your license type).This feature is currently available for Project Manager, Models Manager, Materials Manager, Batch Render&Relink, FilePathFinder, and Sweep PRO.
Soon it will also be extended to other plugins.Internet connection is required for activation and occasional validation.
Note: By default, the online license is activated for all new purchases.
If you are still using the old (offline) license type, you can easily switch to the online license in your dashboard.
This significantly simplifies license management, especially for teams.If you have reached the maximum number of activations, you can do next:
Deactivate one of the existing activations in your dashboard.
Then activate the new computer with the same key.You can update your license using one from multiple methods.
Select the most suitable transferring type:- Run the “Registration”* tool and click the “Move License” button*.
Choose from the opened window the license file that you used previously.
The request for transferring will be automatically sent to the server.
Your license will be updated immediately. (Only if you are upgrading the license is rare) - Run the “Registration” tool and click “Generate ID-File” button*.
Login and send the identification file using the dashboard.
During one hour you receive the new license.
- Run the “Registration”* tool and click the “Move License” button*.
*Find it on the plugin’s menu “Help” => “Activation”.
*Start on the computer, on which you plan to use the plugin.
Note:
Please use your permanent e-mail box (same as you use at purchasing).
You can always restore your password on this page – Restore password.
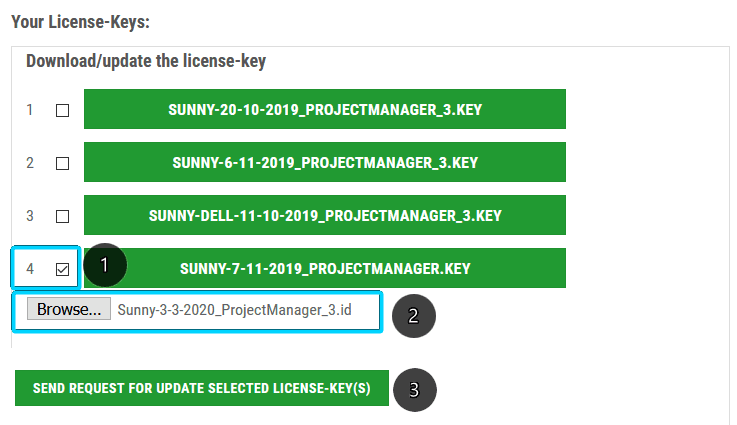
Updating the license-key on the dashboard page
- Select license for upgrading and turn on the checkbox
- Add the generated id file
- Press the button “Send request for update selected license-key(s)”
- Type the reason for upgrading
- Press the button “Send request”

Can I upgrade my license of “FilePatFinder” (or another) to “Project Manager”?
Please contact us if you want an upgrade your license to “Project Manager”:
Request for an upgrade.Is available the academic discounts?
We are excited to offer an exclusive 50% discount to all students and educators on our Kstudio plugins for 3ds Max.
Whether you’re mastering the art of 3D modeling or teaching it, our tools are designed to enhance your creative process.Academic License Details:
– The academic version of Kstudio is fully identical to our commercial products.
– To purchase at the discounted rate, please provide proof of your academic status.
– You must be currently enrolled in or employed by an accredited educational institution with a focus on 3D graphics, architecture, design, or a related field.
– The academic license is strictly for non-commercial use.Student Licensing Terms:
– Student licenses are issued for a two-year term.
After (or during) this period, students have two options to continue using their plugin:
1. Extend the license for an additional fee of 40% of the original purchase price.
2. Refer a friend who also buys a plugin, either the same or a higher-priced model.– Upon successful extension, either through payment or referral, the license will be upgraded to allow commercial use.
Additionally, this upgrade qualifies you for a free additional license under our ‘Free Additional License‘ offer.Bring a Friend – Extend for Free!
– Extend your license without extra cost by referring another student who purchases a plugin.
Not only do you benefit, but you also help your friends get started with professional-grade tools.For more information or to request your academic discount, please contact us at sales@3d-kstudio.com.
Please note that the ‘Free Additional License‘ offer does not apply to the student version.
However, once upgraded to a commercial license, users are eligible for a free additional license.Before we can fulfill your order, we require proof of qualification or studies at a relevant educational institution to qualify for the academic discount on Kstudio plugins for 3Ds Max.
What’s the difference between the demo and the full version?
The demo version of Project Manager allows working only with a limited number of files.
You can’t select items with the label “Demo”.
The demo version of Batch Render&Relink doesn’t allow to relink files and render only part of files in the low resolution.
How to Distinguish Between the Full and the Demo Version You Downloaded and Installed?
To determine if you have downloaded and installed the full version or the demo version, here are some key points to consider:
1. Activation: The demo version cannot be activated. If you have downloaded the demo version, activation will not be possible.
2. File Name: The archive containing the demo version will include the word “Demo” in its name.
3. Installation and Launch: During installation or when launching the plugin, the demo version will display the word “Demo” next to the logo.
4. Full Version: If there is no “Demo” label on the logo, but you see the “Demo” label over files, it means you have the full version which requires a license key for activation.Full VersionDemo VersionSimplified deployment: silent mode installation
Silent (unattended) installation — Project Manager 4
Kstudio plugins are used by freelancers as well as in studios of different sizes – from several employees to hundreds.
Silent (unattended) installation simplifies the deployment of numerous installations into a large network: the setup runs with no dialogs, no questions and no user interaction at all.
In Project Manager 4 everything is built into the installer itself – you pass the options on the command line, and no additional helper package is required.
Project Manager 4 can be deployed across a studio without any user interaction. The setup executable accepts command-line switches directly, so you can push it with PsExec, PowerShell Remoting, an RMM tool, a GPO startup script or any deployment system that can run an
.exe.Requires Project Manager 4.01.15 or newer. Earlier builds ignore these command-line options.
Download the current installer from our website before you prepare a deployment.Quick start
Install for all 3ds Max versions found on the machine, without any window, and activate an online license key:
Project_Manager_Setup.exe /VERYSILENT /MAXVERSIONS=all /LICENSE=XXXX-XXXX-XXXX-XXXXA more typical studio command — pick the Max versions, set the interface language, choose the AI search languages, reuse a shared model cache on a network share, and write a deployment log:
Project_Manager_Setup.exe /VERYSILENT /MAXVERSIONS=2025,2026 /LANG=en-US /SEARCHLANGS=de,multi /LICENSE=XXXX-XXXX-XXXX-XXXX /AICACHE=\\nas\deploy\pm4-models /LOG=C:\deploy\pm4.logRun the installer with
/?to print the same reference to the calling console:Project_Manager_Setup.exe /?Command-line options
Switches follow the Inno Setup style —
/KEYor/KEY=value, case-insensitive. Quote any value that contains spaces, e.g./AICACHE="D:\My Deploy\models".Option Meaning Default /SILENTNo prompts and no questions. A small progress window stays visible while AI models download. — /VERYSILENTNo prompts and no window at all. Implies /SILENT.— /CONFIG=<file.ini>Read the options below from the [Setup]section of an INI file (key names without the leading slash). Command-line options override the file.— /MAXVERSIONS=<list>3ds Max versions to install into: 2025,2026orall.alldetected/LANG=<culture>Plugin interface language, e.g. en-US,de-DE,ja-JP.Language of a previous installation, otherwise the Windows UI language, otherwise English /SEARCHLANGS=<list>Languages for AI search queries: short codes such as de,fr,multi, orauto, ornone.auto/LICENSE=<key>Online license key. Offline activation keys are not supported here — see below. — /NOAI(same as/AI=0)Do not install the AI engine and do not download any AI model. AI enabled /AICACHE=<dir>Folder holding the AI model archives. Missing archives are downloaded into it, so the next machine reuses them. — /DIR=<path>AI engine folder. %LOCALAPPDATA%\Kstudio\AI-Engines/LOG=<file>Write the installation log to this file in addition to the standard log. — /NORESTARTNever prompt to restart Windows. A pending restart is reported through exit code 3010instead.— /?,/HELPPrint the option list and exit. — Unknown options are an error, not a warning. A misspelled switch or an invalid value stops the installer with exit code
1before anything is installed — a silent installation that quietly ignored your/LICENSEwould look successful, which is worse than failing.Using a configuration file
For large rollouts it is easier to keep the settings in one INI file and pass a single switch. Use the same key names without the leading slash, in a
[Setup]section; flags accept1,trueoryes.[Setup] VERYSILENT=1 MAXVERSIONS=2025,2026 LANG=en-US SEARCHLANGS=de,fr,multi AICACHE=\\nas\deploy\pm4-models LOG=C:\deploy\pm4.log NORESTART=1Project_Manager_Setup.exe /CONFIG=\\nas\deploy\pm4.ini /LICENSE=XXXX-XXXX-XXXX-XXXXAnything given on the command line wins over the file, so one shared INI plus a per-machine license key is usually all you need.
Licensing
Pass a single online license key with
/LICENSE. The key is applied right after the files are installed, using the same licensing library the registration dialog inside 3ds Max uses.- Internet access is required at activation time.
- Offline activation keys are not supported in silent mode: they require a manual round trip with identification files through our website. Such a key is rejected with exit code
4and a clear message in the log. - If activation fails — no network on the machine being deployed, for example — the installation itself still succeeds. The key is stored in
%LOCALAPPDATA%\Kstudio\ProjectManager_4-pending.keysand applied automatically on the first 3ds Max start, silently, as soon as the machine can reach the licensing server. The installer returns exit code4so your deployment report shows the machine as “installed, not yet licensed”.
Important — run it as the target user. The license file is written into the profile of the account the installer process runs under. Start the silent installation elevated as the user who will run 3ds Max (a normal UAC elevation of that same account).
Launching it through “Run as different user” or asSYSTEMwould put the license into the wrong profile.AI models and the shared cache
The AI features (visual search, classification, text search, multilingual queries) need model files. The installer downloads them automatically — you do not have to prepare anything.
On a single machine that is a one-time download; across a studio, downloading gigabytes to every workstation is not./AICACHE=<folder>solves this with one switch. The cache is self-filling: if an archive is missing from the folder it is downloaded as usual and kept there; if it is present, it is unpacked locally with no network traffic at all. Point every machine at the same network share, and the first one populates it for the rest. Downloads are written through a temporary.partfile, so several machines can fill the same share at the same time.Manual preparation is only a fallback — for machines with no internet access, or when you want the very first deployment to run offline too. File names in the cache are fixed and readable, so you can fill the folder by hand; see How to manually download and install AI models for the direct links:
File Contents clip-vit-l14-full.zipVisual model — image search and AI classification clip-vit-l14-text_encoder.zipText encoder — search by text description opus-mt-<code>-en.zipTranslation model for one search language, e.g. opus-mt-de-en.zipsmall100-330M.zipMulti-language model, used for the multisearch languageIf the workstations have no internet access at all, download the archives once on any machine with a connection, put them into the
/AICACHEfolder under exactly the names above, and the silent installation will run fully offline.A cached archive that turns out to be truncated or corrupted is discarded and re-downloaded, so a broken share cannot silently produce broken installations.
If you do not want AI features at all, use
/NOAI: nothing is downloaded and the installation takes seconds.AI search languages
/SEARCHLANGScontrols which translation models are installed, i.e. in which languages your artists can type search queries.auto(default) — keep the languages already installed on that machine, otherwise follow the interface language.none— install no translation model. English queries always work without one.- An explicit list —
/SEARCHLANGS=de,fr,multi. Exactly these are installed and any other previously installed language is removed.
Use
multifor languages without a dedicated model — one shared multi-language model covers them.Supported search language codes:
uk,de,es,fr,it,pl,pt,tr,zh,ja,da,ar,nl,ko,hi,sv,id,sk,cs,bg,hu,vi,th,tl,fi,ro,he,el,hr,no,multi.Supported interface languages (
/LANG):en-US,da-DK,de-DE,es-ES,fr-FR,it-IT,pl-PL,pt-BR,tr-TR,uk-UA,zh-CN,ja-JP.Exit codes
The installer returns a meaningful exit code, so a deployment script can tell “done” from “installed but needs attention”.
Code Meaning 0Success. 1Invalid arguments — nothing was installed. 2None of the requested 3ds Max versions was found on the machine. 3Installation failed. 4Installed, but the license key was not activated (no network, wrong key, or an offline-activation key). 5Installed, but one or more AI models could not be downloaded. The plugin works; the affected AI feature does not until the model is present. 6Installed, but the AI engine could not be placed into the user profile, so AI features are unavailable. Unlike code 5, the models themselves may be fine — the executable files are missing.7The silent installation was interrupted before it finished — for example, somebody closed the /SILENTprogress window.3010Installed, a Windows restart is required to finish. If several things go wrong at once, the first problem is the one reported — a failed installation is more interesting than the license that could not be applied afterwards. The log always lists every issue.
Logging
Every silent run logs each decision it made — selected Max versions, interface language, search languages, model cache hits, license activation result. Two destinations:
- Always:
%LOCALAPPDATA%\Kstudio\data\logs\kstudio.log - Additionally, with
/LOG=<file>: your own file, which is convenient to collect on a share, e.g./LOG=\\nas\deploy\logs\%COMPUTERNAME%.log
If a machine reports a non-zero exit code, that log is the first place to look.
Before you deploy
- Close 3ds Max on the target machine. In interactive mode the installer warns you; in silent mode it does not ask, and files in use cannot be replaced.
- Administrator rights are required — the plugin is installed for all users, under
%ProgramData%\Autodesk\ApplicationPlugins. - Internet access is needed for license activation and for any AI model that is not already in your
/AICACHEfolder. With a fully populated cache and/LICENSEomitted, a silent install needs no network at all. - Demo assets are never installed in silent mode.
- Test the exact command on one machine first, then roll it out.
Deployment examples
PsExec — one machine, waiting for the result:
psexec \\WS-014 -u DOMAIN\artist -p *** -h -w C:\deploy C:\deploy\Project_Manager_Setup.exe /VERYSILENT /CONFIG=C:\deploy\pm4.ini /LICENSE=XXXX-XXXX-XXXX-XXXXPowerShell Remoting — a list of machines, collecting exit codes:
$machines = 'WS-011','WS-012','WS-013'
foreach ($m in $machines) {
    $code = (Invoke-Command -ComputerName $m -ScriptBlock {
        $p = Start-Process 'C:\deploy\Project_Manager_Setup.exe' `
             -ArgumentList '/VERYSILENT','/CONFIG=C:\deploy\pm4.ini' `
             -Wait -PassThru
        $p.ExitCode
    })
    Write-Host "$m -> $code"
}
Exit code
0means finished;4means the plugin is installed and the key will be applied on the first 3ds Max start;3010means the machine still needs a restart.Related
- Manually downloading and installing AI models
- Standard installation and how to receive your license key — see the corresponding FAQ article.
- Deploying Project Manager 3
Legacy: silent installation for Project Manager 3This section applies to Project Manager 3 only. Version 4 does not use the SilentModeInstall package — see the instructions above.
Using:
- Download and extract the archive SilentModeInstall.zip
- Copy the ZIP archive with the full version of the plugin into one folder with “AutoInstallStart.bat”
- Open “AutoInstallStart.bat” and uncomment/add a valid path to 3dsMax.exe
- Write activation keys to the file “Activation/ActivationKeys.txt”
- Run “AutoInstallStart.bat” using PsExec/PowerShell or manually on each computer
Note: Internet connection is required to use activation keys
Download example: SilentModeInstall.zipSee Also:


General questions on Using the Project Manager:
Is there a way to add multiple folders at once?!
It is simple!
Select multiple folders in Windows Explorer and drag them on “Project Manager” treeview panel.How to relink and collect maps for 3D Models to their corresponding local maps folder?

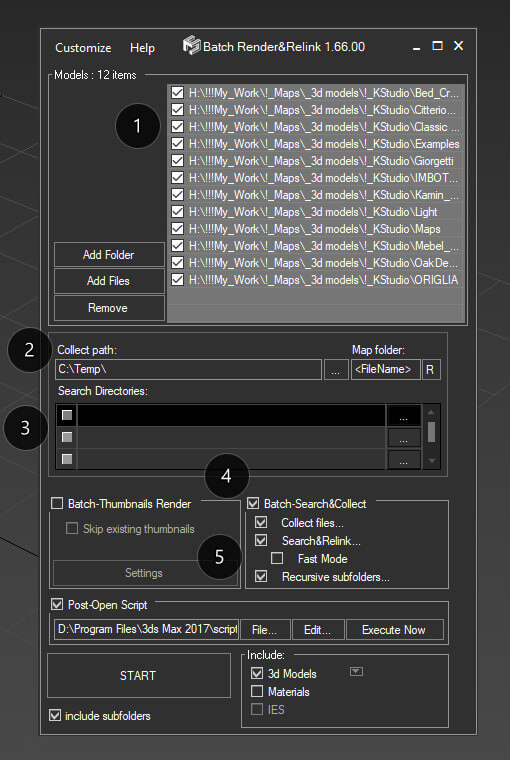
Just use “Batch Render&Relink” tool for this. Batch Render&Relink shipped with Project Manager.
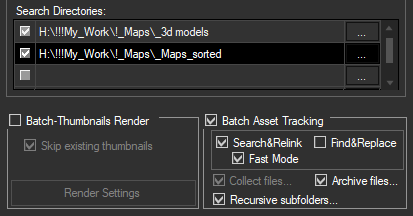
Turn on the option “Batch-Search&Collect“, and “Collect files…” if you want to collect assets. (4)
Use “Fast mode” for relinking maps in 3ds max files without opening each file. Use this option if your scenes saved in 3ds max 2010 or above and used plugins support this capability. For example, Maxwell renderer doesn’t allow relink assets without opening a 3ds max scene. (5)
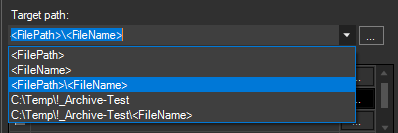
For collecting maps to one directory with model set the “Collect path” to <FilePath> and “Map Folder” to <FileName>. Also, you can specify an absolute path to the directory and map folder like “C:\Models” and “Maps”. (2)
Specify directories with models in the list at top (1) and set directories for searching assets in the list “Search Directories: ” (3)
See also related articles on 3d-kstudio:
https://3d-kstudio.com/tutorials/manage-asset-files-project-manager/
And videos:
How to switch between high/low resolution version of the 3ds max scene
Using Project Manager you can change your models and textures to lower resolution versions.
For example, you can use the next scheme:
Place low-poly models and textures to a directory called “low-poly” and hi-poly to another directory – “hi-poly”.
Find&Replace Links
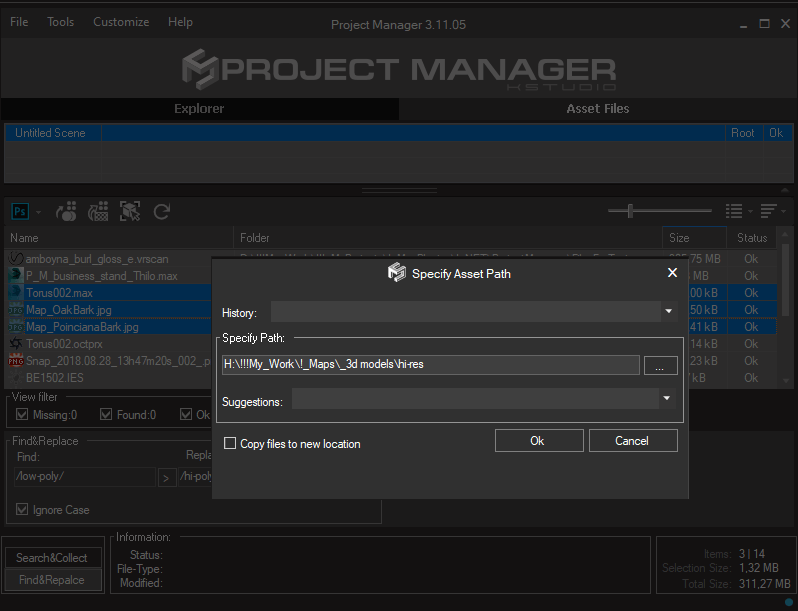
For switching between high-res/low assets use the function “Find-Replace” what present in the Project Manage functionality.
Just open Project Manager and type “/low-poly/” to the field “Find” and “/hi-poly/” to the field “Replace”. Press the Apply button.
This will replace all links to scene assets to high-res.

Also, you can relink only selected assets – just select desired links in the list and choose in the context-menu the menu-item “Set path”
Specify the path to high-res/low assets.
Of course, models should be placed as xRef or Proxy.

Convert & Resize Images
Also Project Manager from version 3.11.45 supports to resize image files. You can use this functionality to resize your images to lower resolution.

Replace 3D Models
For replacing non-xRef to another (high/low) use the Replace 3D Model functionality.
Please see this video.
How to Archive 3Ds Max files and Material Libraries with Assets in the Batch mode
Batch Archiving
Use Project Manager to archive multiple 3ds Max files and Material Libraries at once, collecting all linked assets, including all xRefs at all depth.
This is an extremely useful feature for backing up your projects and models, transferring data to another location, or rendering on a render-farm, such as RebusFarm.
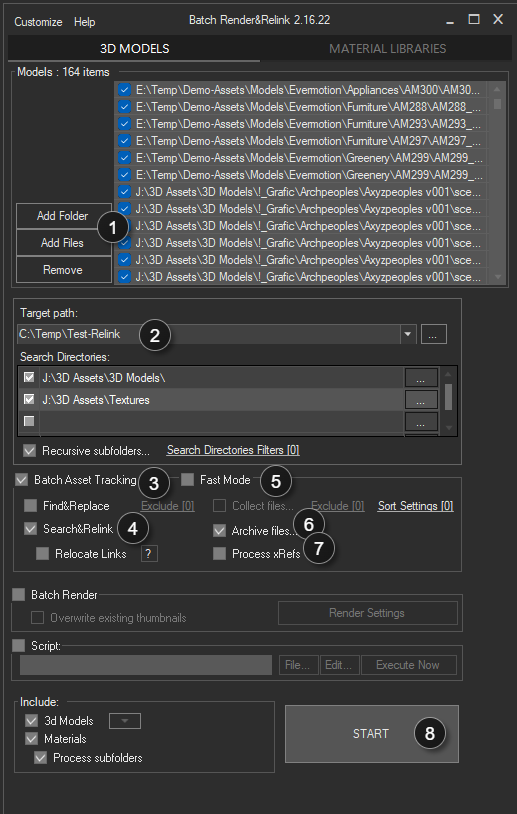
Just run the “Batch Render&Relink*”, add a folder (folders) or some 3ds Max files or a material library, specify the folder where you want the data stored, and shortly you will have all the archives ready.
*Applicable to the 3ds Max utility “Batch Render&Relink” and Windows application “Batch Relink” The utility “Batch Render&Relink” which shipped with Project Manager and FilePathFinder PRO. Also, you can acquire “Batch Render&Relink” as a separate tool
- Add files/directories for archiving 3d files with assets
- Specify the path to store archives (supports full and relative paths)
- Turn on the Batch Asset Tracking option
- Turn on the Search&Relink option (optionally)
- Turn on the Fast Mode (recommended, optionally)
- Turn on the Archive files
- Turn on the Process xRefs (recommended, optionally)
- Run the process by pressing the START button

The archives will, of course, contain the source files for the scenes and materials. When opening a scene from the archive on another computer, all links will remain valid, because the links during archiving are made using relative paths.
Before archiving, you can use Search&Relink option to search for missing links, if necessary.

For the target folder, you can specify both full and relative paths. For the latter, use <FilePath> and <FileName> masks.

PS. Previously, this feature was only available with the Project Manager API
With Project Manager, you can write scripts expanding the features of the plugin in a way that you specifically need for your tasks.
This makes Project Manager incredibly flexible and you can always, if necessary, tailor it to your everyday needs or even to the needs of a particular project.Is it possible to display all content of the directory?
Of course!
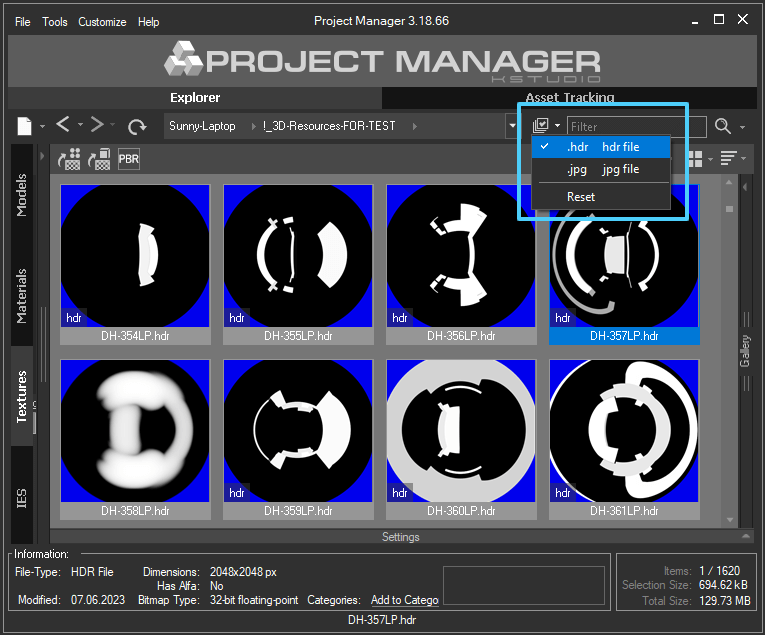
Use the filter button on the panel.

Is it possible to customize file types for displaying/hide them by default?
You can add or hide file types from the list on the “Models” and “Textures” tabs.
The way this option works varies slightly on these tabs.On the Models tab, this option applies to all folders. Also on the Models tab, you can add new file types that will be displayed in the default list. To disable any filters for models, click on the button.
On the Textures tab, you can only turn on/off file types from the list, which only affects the active folder. This filter is saved and will be applied the next time as well.
If you want to render a file format that is supported by 3ds Max, but you don’t see it in the list, simply add it using the menu.
How I can Add a New Material to the Material Library?
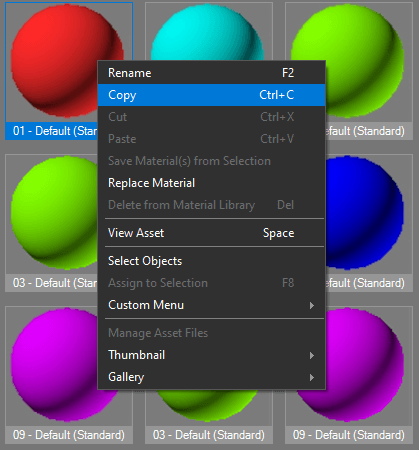
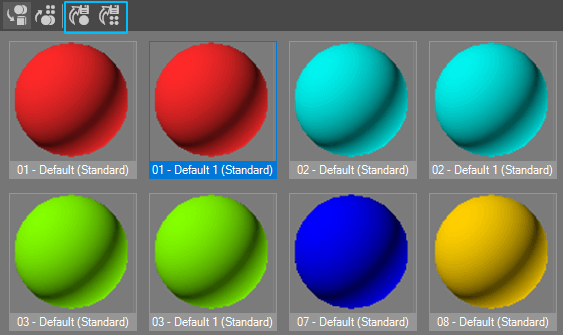
You can save material to the Material Library just by dragging the material from Standart or Slate Material Editor
directly to the Material Library that opened in the Project Manager:Or save material to the Material Library using Copy/Paste method:

Also you can use the buttons on the panel

To add the Material Library file to Project Manager, go to the “Materials” tab and drag the folder containing the Material Library files onto the treeview
Is it possible to Replace Materials with Project Manager?
Choose a material with which you wish to replace a scene material.
Copy it (CTRL + C) or from the context menu item “Copy”.
Go to the catalog “Scene Materials” and select the material you want to replace.
(To quickly find the material in the scene, you can use a >>filter)
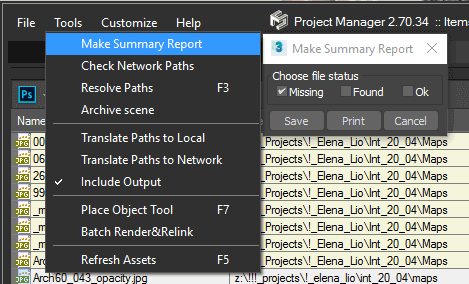
Choose in the context menu the item “Replace Material”.Does it possible to export the list of the missing maps to file?
You can export the list of the missing maps to file using the menu-item “Make Summary Report” from menu “Tools”.

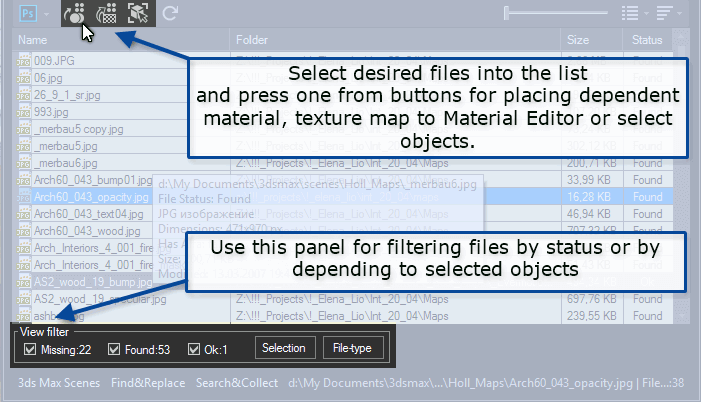
How to find what material/object contains a missing texture map?
It’s simple using Project Manager or FilePathFinder.
Select desired files into the list and press one from buttons on top panel for placing dependent material, texture map to Material Editor or select objects.
Using panel on bottom you can filter files by status or by depending to selected objects.
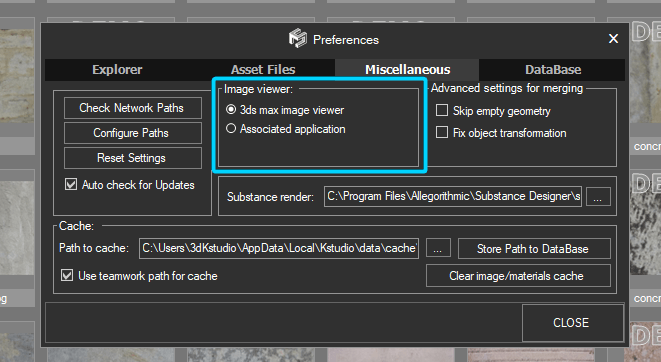
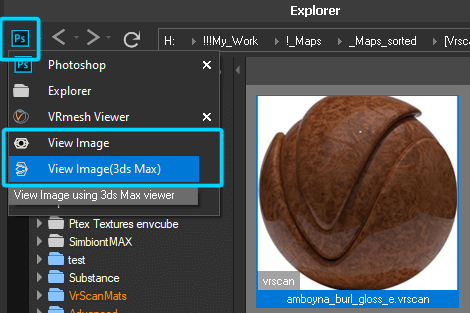
Where find the option to preview images in the 3rd version?
The option for choosing the default viewer for images in the associated application is moved to Project Manager menu above the address bar.

>>>

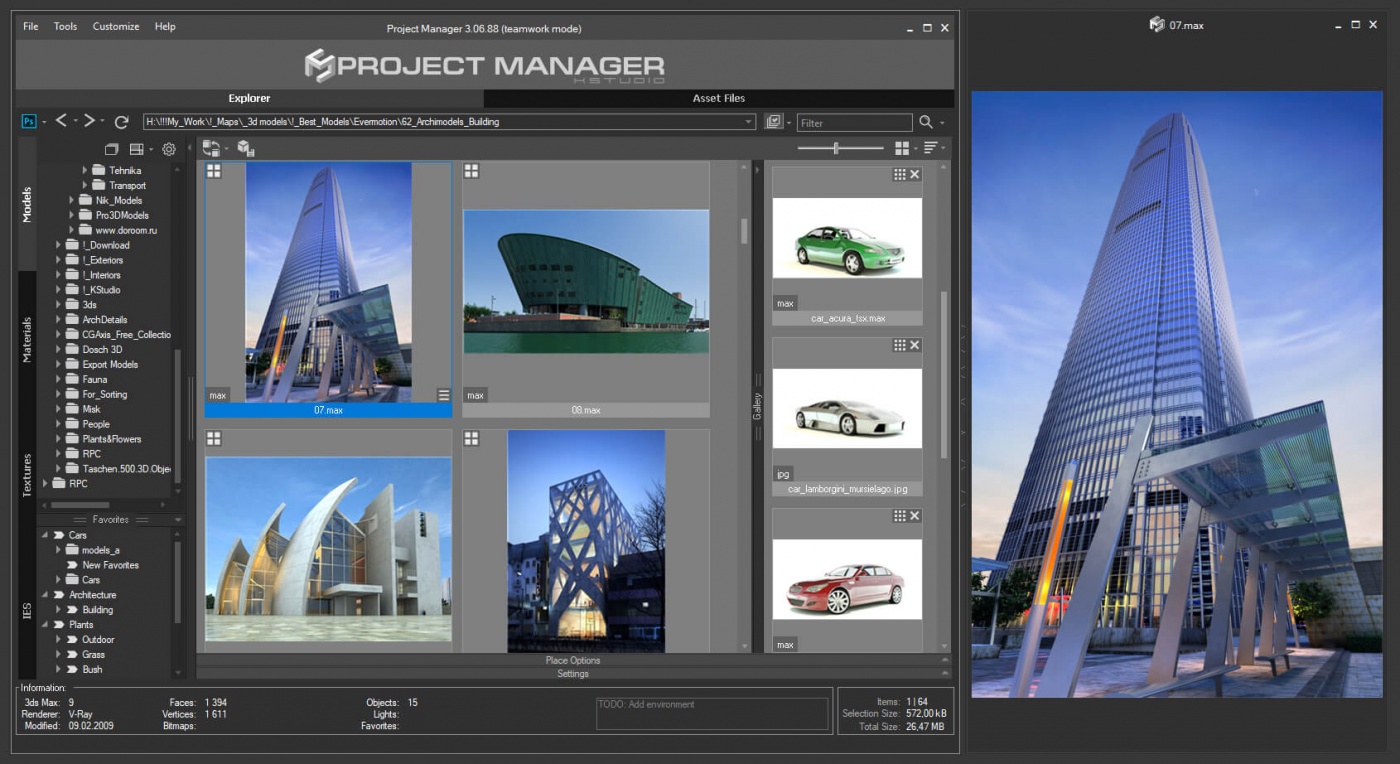
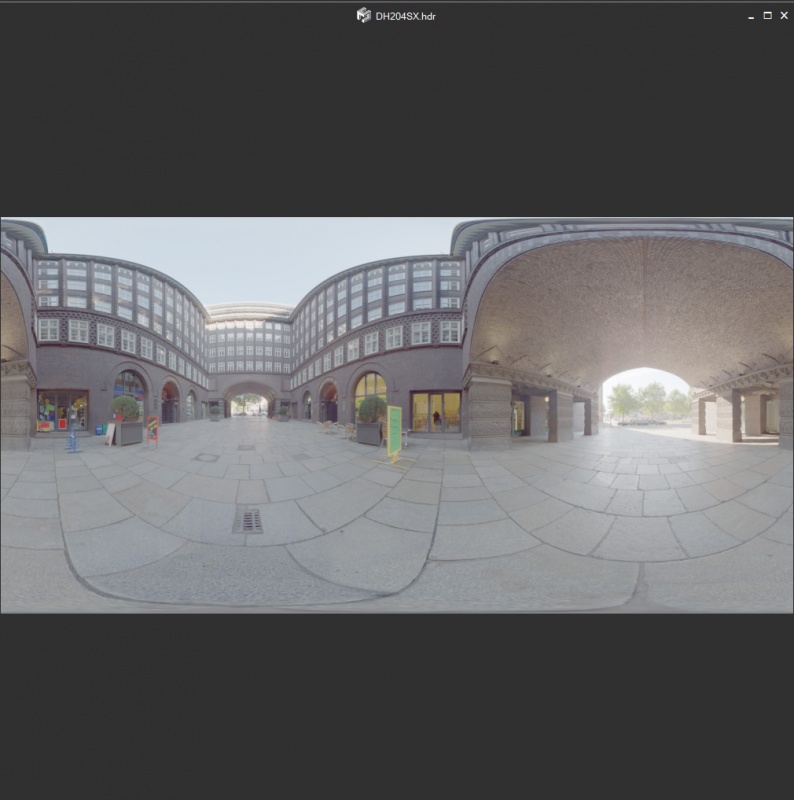
Project Manager viewport
Also 3rd version allows viewing any type of asset in a separate window. Whether is it an image, an HDRI file, a 3D FBX file, 3DS, BVH or IES file – any of these files you can view in high resolution in a separate window. The file in the window is updated when you change the file selection in the list. You can also save the selected view for a 3D file into the file’s gallery.
To opening a file in a separate window, find a related option on the menu or use the SPACEBAR key.


How can I manually download and install AI models?
If the installer could not download the AI models automatically during installation,
you can download and install them manually.Before unpacking the files, make sure that the AssetAI tray application is not running.
If its icon is visible in the Windows notification area, right-click it and select Exit.Language models for AI-powered search
Download the archive for the language you want to use and extract all files into its destination folder.
Do not create an additional folder inside the destination folder.Note: The Multi-language (Other languages) model supports all languages.
However, for better search quality, we recommend using a dedicated language model whenever one is available.Language Download Destination folder This content is only available to registered users. LoginAI Classifier model
The AI Classifier model enables AI-powered classification, image similarity search, and text search.
Download the archive and extract all its contents into:
%localappdata%\Kstudio\AI-Engines\config\ViT-L_14Keep the
text_encodersubfolder from the archive. Do not rename any files and do not create an additional nestedViT-L_14folder.After extraction, the folder structure must be:
%localappdata%\Kstudio\AI-Engines\config\ViT-L_14\clip_visual_l14@226.onnx

%localappdata%\Kstudio\AI-Engines\config\ViT-L_14\text_encoder\clip_text_l14.onnx

%localappdata%\Kstudio\AI-Engines\config\ViT-L_14\text_encoder\bpe_simple_vocab_16e6.txt.gz
This content is only available to registered users. LoginWhy Material Previews Aren’t Showing Up and How to Fix It?
If you are experiencing issues with material previews not showing up in Project/Materials Manager, there are a few steps you can take to troubleshoot and resolve the issue.
Step 1:
Uncheck ‘Disable Interactive Rendering for Materials’
One common reason material previews might not show up is because interactive rendering is disabled for materials.
To resolve this, open the menu Customize and ensure that the ‘Disable Interactive Rendering for Materials’ option is unchecked.
This should allow your material previews to render interactively.
(This option is also available in the plugin’s Preferences settings)Step 2:
Check Compatibility With Active Renderer
Another crucial step is to ensure that the active renderer you are using is compatible with the materials. Different renderers have varying levels of compatibility with materials, so it’s essential to verify this in your software settings. Some renderers may require specific configurations to display material previews correctly.
Step 3:
Render Preview for Materials
If your material previews still aren’t showing up, consider rendering thumbnails for your materials.
Use the option “Render Thumbnails” to rendering previews for selected materials immediately, or “Add to Batch Render” to rendering preview using the Batch Render&Relink utility later.This option is not available for the scene materials
How I can merge an animated model with keeping a hierarchy?
There are a few options to keep a hierarchy for an animated model:
- Merge using double-click on 3D file
- Merge using the menu-item “Merge with default 3Ds Max Dialog” from the right-click menu “Merge”

Hold the SHIFT key when dragging a model.

How to setup studio with reference model

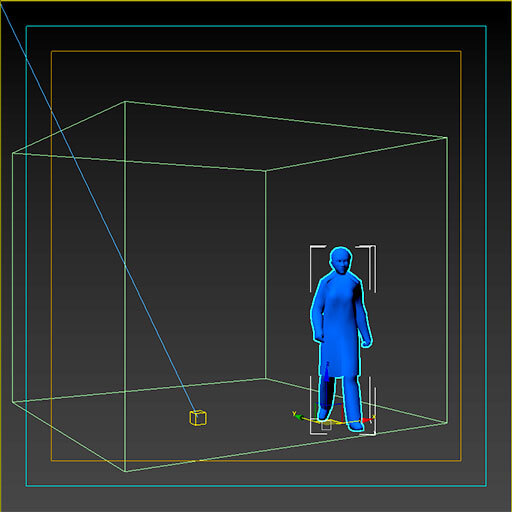
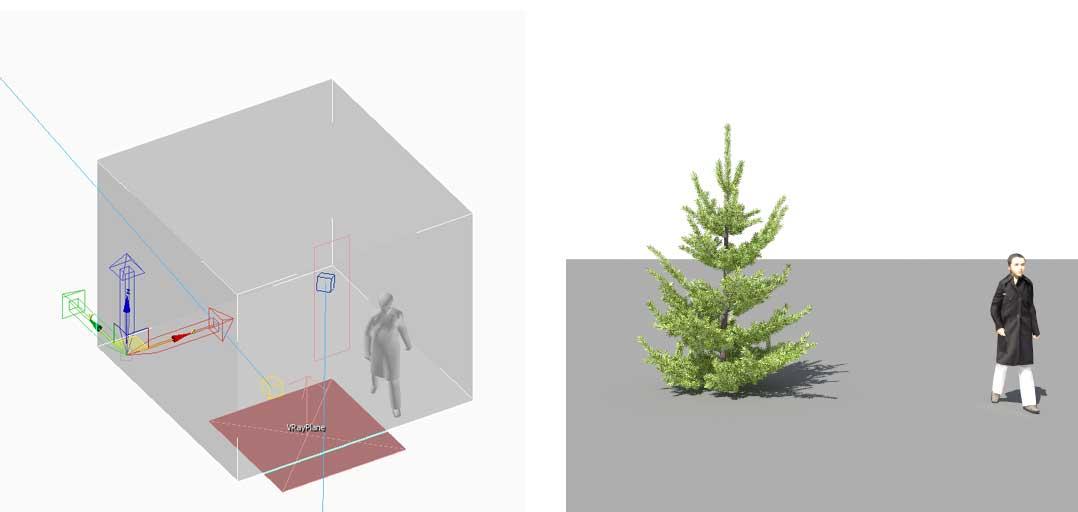
Let’s talk about how to set up a studio for rendering previews for 3d models with a reference model in the Project Manager.
Open your studio and insert the desired model used as a reference.
The reference model should be located inside the “SceneDummy” object.
Move SceneDummy’s pivot point to specify the position of the model on rendering preview.
Open the “Render Thumbnails Preferences” and turn on the checkbox “Use custom studio” and “Fit view”
Turn of the “Fit to Dummy” checkbox.
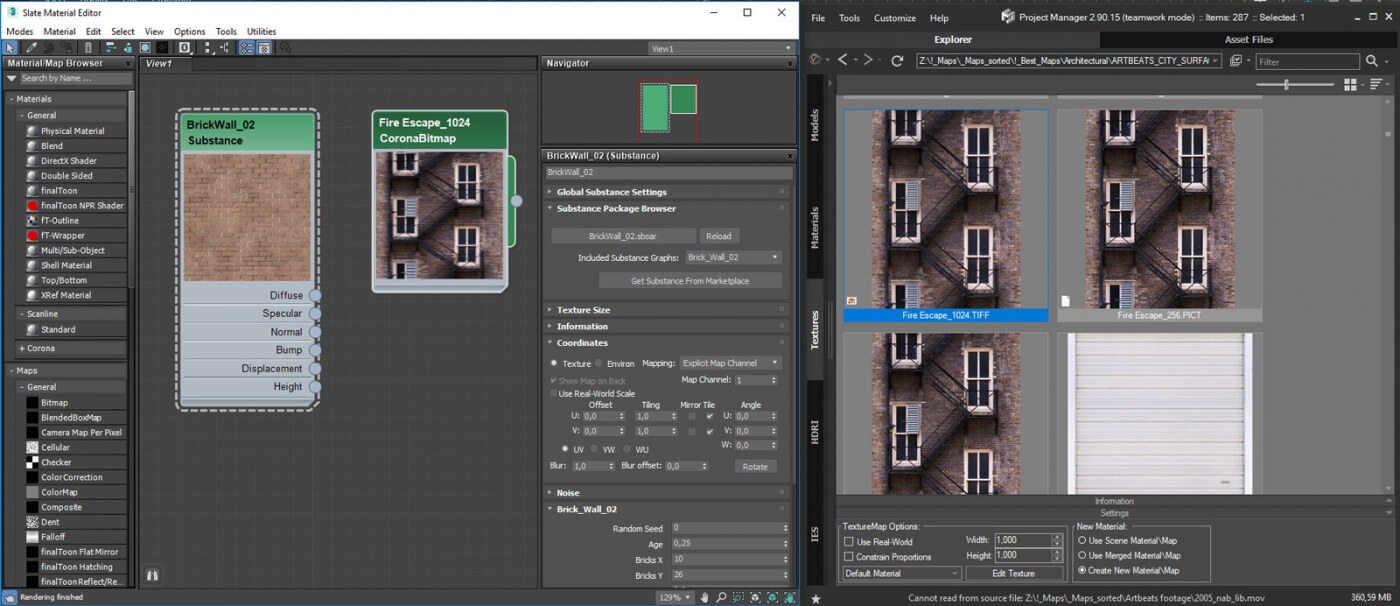
How to create a Bitmap instead of Material when dragging to Material Editor
Just hold the SHIFT key while dragging the bitmap/map into Material Editor.
A textureMap supported by your active renderer (Bitmap, CoronaBitmap, etc.) will be created.
How I can Transfer/Backup/Restore the Settings?
Use the tool “Export/Import Settings” for exporting the settings before reinstalling the 3ds Max or Windows.
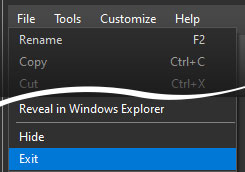
Or for transferring them to another computer.- Before restoring settings you should close the plugin using the menu “File” => “Exit”
- Don’t miss to turn on all desired settings to import. Some settings, such as database, by default, are ignored

By default the settings are placed in this directory:
%USERPROFILE%\AppData\Local\Autodesk\3dsMax\20XX – 64bit\ENU\scripts\Kstudio\ProjectManager_3\Settings\About upgrading a database from 2nd to 3rd version please read the next article:
https://3d-kstudio.com/support/faq/#21770Upgrade Database to 3rd version of Project Manager
When installing the 3rd version, a new database is created and the data is copied from the existing one.
In this way, you can upgrade to a new database, but at the same time, if you use a common database with your team, your team will be able to use the previous version of the database. Thus, you can deploy a new version gradually, transferring your team to use the new version step by step.
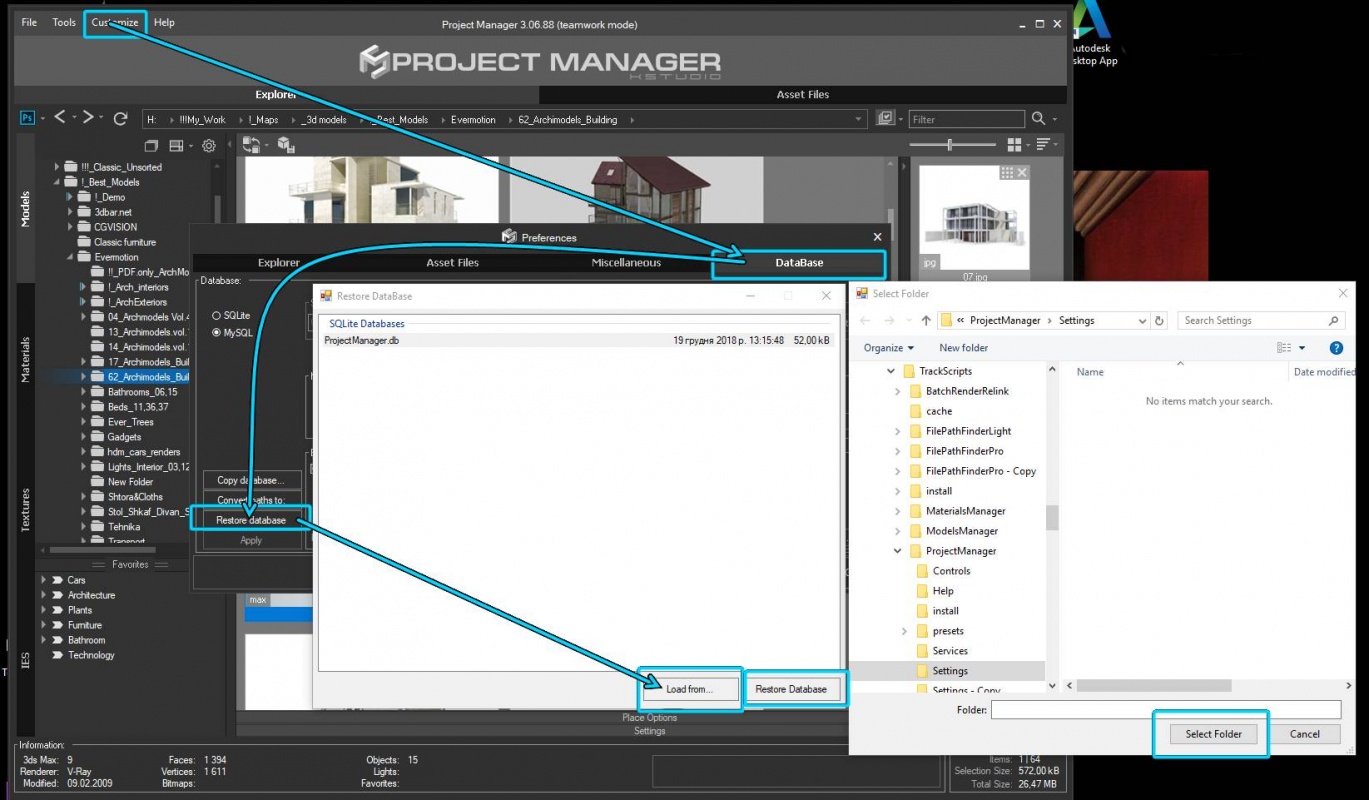
Also, if necessary, you can always update your database manually using the “Restore database” utility.
To do this, open the preferences dialog => tab “DataBase” =>
press the “Restore database” button => “Load from” and specify the location of backups database for 2nd version. ( By default the database for 2nd version located in the directory %USERPROFILE%\AppData\Local\Autodesk\3dsMax\20XX – 64bit\ENU\scripts\\ProjectManager\temp\databaseBackup)
Select the database in the list and press the “Restore database” button.
What is the difference between the “Models Manager” & “Project Manager”
- The “Project Manager” unlike “Models Manager” supports to materials, bitmaps and ies-files.
- The “Project Manager” contain the tool “Batch Render&Relink”.
- The “Project Manager” contain all abilities of the “FilePathFinder PRO”
- See Comparison for Kstudio asset management tools on this page.
What is the difference between the “Materials Manager” & “Project Manager”
- The “Project Manager” unlike “Materials Manager” supports to 3d models, bitmaps and IES files.
- The “Project Manager” contain the tool “Batch Render&Relink”.
- The “Project Manager” contain all abilities of the “FilePathFinder PRO”
- See Comparison for Kstudio asset management tools on this page.
Which 3d programs and renderers are supported?
- 3ds Max 2016 and above (see the additional information tab on the related page of the product )
- Arnold
- Corona
- Final Render
- FStorm Render
- Indigo
- Maxwell
- Mental Ray
- Octane
- RedShift
- Scanline
- Vray
- Another renderers and plugins
Note: Please use latest updates for your version of 3ds max
3ds Max Updates & Service Packs
For plug-in work it is required to Net Framework version 4.0.
https://www.microsoft.com/net/download/framework


Troubleshooting:
How to fix plugin registration error
At first, restart computer and try again.
If this won’t help, follow the next steps:Run 3ds Max as Administrator and Try Again:
Sometimes, insufficient permissions prevent the license key from being applied. Close 3ds Max, right-click its shortcut, and select “Run as administrator.” Then, try to apply the license key again.Troubleshooting WMI Service:
Looks like Windows Management Instrumentation service on your computer doesn’t work correctly.
I would like to outline some common solutions that often rectify issues with WMI.1. Restart WMI Service:
– Sometimes, simply restarting the WMI service can resolve the issue. To do this, go to the Start menu, type “services.msc”, and press Enter. In the Services window, locate “Windows Management Instrumentation”, right-click it, and select “Restart”.2. Check WMI Repository for Consistency:
– Corrupt WMI repositories can cause issues. To check the consistency of the WMI repository, open Command Prompt as an administrator and run the following command:winmgmt /verifyrepository.
If it reports inconsistency, repair it usingwinmgmt /salvagerepository.3. Rebuild WMI Repository (if necessary):
– If the repository is damaged, you might need to rebuild it. This can be done with the command: `winmgmt /resetrepository`. Note: This action will reset the repository to its initial state; any custom settings or third-party WMI information will be lost.4. Renaming Wbem/Repository folder to fix WMI issues1. Stop all WMI-related services:
– Open Command Prompt as administrator
– Execute the following commands:
net stop winmgmt
net stop iphlpsvc
net stop wscsvc2. Rename the Repository folder:
– Open Windows Explorer
– Navigate to `C:\Windows\System32\wbem\`
– Locate the “Repository” folder
– Rename it to “Repository.old”3. Restart the computer
4. After reboot, Windows will automatically create a new Repository folder
5. Verify WMI functionality:
– Open Command Prompt as administrator
– Run the command:winmgmt /verifyrepository
– If everything is fine, you’ll see the message “WMI repository is consistent”7. After successfully restoring WMI functionality, you can delete the old “Repository.old” folder
Note: This method may result in the loss of custom WMI settings. It’s recommended to create a system restore point before performing these steps.
5. Ensure Proper Permissions:
– Sometimes, issues can be due to insufficient permissions. Make sure your user account has administrative privileges.6. Update Windows:
– Ensure your Windows is up to date. Sometimes, Microsoft releases patches that can resolve underlying issues with services like WMI.7. Run System File Checker:
– Corrupted system files can impact WMI. To check and repair system files, run the System File Checker tool. Open Command Prompt as an administrator and executesfc /scannow.8. Consider a System Restore:
– If the issue started recently, performing a system restore to a point where WMI was functioning correctly might help.9. Check for Malware:
– Run a thorough antivirus scan. Malware can sometimes interfere with system services.After completing these steps, please reboot your system and check if the WMI issue persists.
If the problem continues, there might be a more specific issue at play, and I would recommend seeking further assistance, possibly from a professional IT service provider.I activated my license, but when I launch the plugin, it says the license is invalid. What should I do?
If the license activates successfully but immediately shows as invalid when you start the plugin, the problem is almost always caused by your firewall or antivirus software blocking internal WMI (Windows Management Instrumentation) requests.
Other possible reasons for license issues include:
Hardware changes: Upgrading or replacing key computer components can cause the license to become invalid.
Major Windows updates: Occasionally, a major OS update can affect system identifiers used for licensing.
How to fix it:
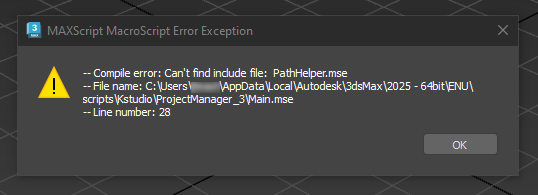
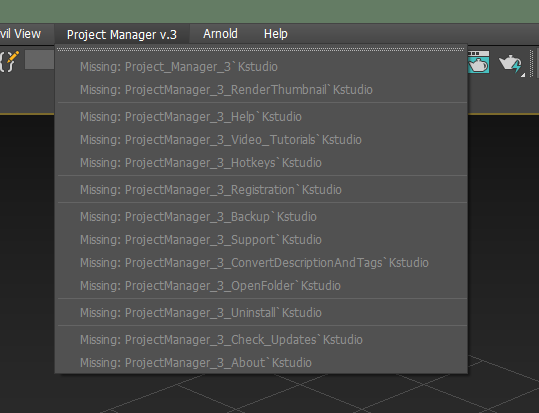
Make sure your firewall and antivirus settings allow local WMI requests inside your system. 3ds Max and the plugin must be able to access WMI services without restrictions.Why is the Project Manager Not Showing Up in the Menu or Showing the Error “Can’t find include file: SomeFile.ms…”?
Issue:
If you’re encountering a situation where the Project Manager (or other plugin) is not appearing in the menu, or you receive the error message “Can’t find include file: SomeFile.ms…”, this is likely due to hidden or system file attributes in your 3ds Max installation.


Cause:
Starting with 3ds Max 2021 Update 3, Autodesk made changes to how scripts are loaded. Scripts or files with the “hidden” or “system” attribute are no longer loaded at startup. This means if any folder or script file associated with your Project Manager plugin has these attributes, 3ds Max will ignore them, leading to errors or missing features.
SOLUTION 1
Fix Hidden Directories- Check for Hidden Directories:
- Navigate to the directory
%localappdata%\Autodeskor its subdirectories. - Check if any folder is marked as “hidden.” Sometimes, Windows or certain software may mark these directories as hidden without your knowledge.
- Navigate to the directory
- Unhide the Folder:
- Right-click the directory or file, select Properties, and ensure the “Hidden” attribute is unchecked.
- Apply the changes to all subfolders and files if prompted.
- Restart 3ds Max:
- After unchecking the hidden attribute, restart 3ds Max, and the Project Manager should now load correctly without errors.
Additional Tip:
To avoid this issue in the future, regularly check your directories if you notice any unusual behavior in 3ds Max, especially after updates. Hidden or system attributes can sometimes be applied automatically, but they can be manually removed following the steps above.
For more details, refer to Autodesk’s official forum post on this subject: Maxscripts Not Loading at Startup.
The Easiest Way to Find and Remove the 'Hidden' Attribute from a Folder recursivelyHere are a few simple methods to find and remove the “hidden” attribute from a folder using Windows Explorer or the Command Prompt:
Method 1: Using Windows Explorer
- Open Windows Explorer and navigate to the folder
%localappdata%\Autodesk(or the folder where your plugin is stored). - In the top menu, click View.
- Check the box next to Hidden items. This will allow you to see all hidden folders and files.
- Now, you’ll see any hidden items, which appear slightly transparent.
- To remove the “hidden” attribute:
- Right-click on the hidden folder or file.
- Select Properties.
- In the bottom section, under Attributes, uncheck the Hidden box.
- Click OK to apply the changes.
Method 2: Using Command Prompt
Open Command Prompt as an administrator.
- Navigate to the directory where you want to remove the “hidden” attribute. For example, if you’re targeting the
%localappdata%\Autodeskfolder, enter:cd %localappdata%\Autodesk
- To recursively remove the “hidden” attribute from all files and folders, use this command:
attrib -h /s /d
- Navigate to the directory where you want to remove the “hidden” attribute. For example, if you’re targeting the
Explanation:
-h: Removes the “hidden” attribute./s: Applies the command to all files in the current directory and subdirectories./d: Applies the command to directories as well as files.
This will remove the “hidden” attribute from all files and folders in the directory you specified, including subdirectories.
Method 3: Using PowerShell
Open PowerShell as an administrator.
To search for hidden folders in
%localappdata%\Autodesk, run this command:Get-ChildItem -Path "$env:localappdata\Autodesk" -Recurse -Force | Where-Object { $_.Attributes -match 'Hidden' }To remove the “hidden” attribute from a specific folder or file, use:
Get-ChildItem "C:\Path\To\Your\Folder"  -Recurse -Force | ForEach-Object {
    if ($_.Attributes -band [System.IO.FileAttributes]::Hidden) {
        $_.Attributes = $_.Attributes -bxor [System.IO.FileAttributes]::Hidden
    }
}
These methods will help you quickly find and remove the “hidden” attribute from any folder or file.
SOLUTION 2
Move Scripts to a new LocationLocate the ENU Folder:
- The ENU folder is a specific directory in your 3ds Max installation path. This is where user-specific settings, scripts, and macros are stored. You can typically find it here:
C:\Users\[YourUsername]\AppData\Local\Autodesk\3dsMax\[YourVersion]\ENU- Replace
[YourUsername]with your actual Windows username and[YourVersion]with the version of 3ds Max you are using.
- The ENU folder is a specific directory in your 3ds Max installation path. This is where user-specific settings, scripts, and macros are stored. You can typically find it here:
Copy the “scripts” Folder:
- Inside the ENU folder, locate the
scriptsdirectory. This folder contains all custom scripts you have installed or created in 3ds Max. - Copy the entire
scriptsfolder. - Navigate to a new location on your computer where you want to store it, such as
Documentsor any other easily accessible folder. For instance, you can paste the copied folder here:C:\Users\[YourUsername]\Documents\3ds Max [version]\
- Inside the ENU folder, locate the
Relink “Additional Scripts” and “Additional Startup Scripts”:
- Open 3ds Max.
- Go to the Customize menu and select Configure User Paths.
- In the dialog that opens, click on the Scripts tab. Here, you will find options for both Additional Scripts and Additional Startup Scripts.
- Click on the Browse button next to Additional Scripts and relink it to the
scriptsfolder you just copied to your new location (for example,Documents\3ds Max [version]\scripts). - Repeat this step for Additional Startup Scripts, making sure it also points to the same copied
scriptsfolder.
Save and Restart:
- After relinking both paths, press OK to apply the changes. It’s a good idea to restart 3ds Max to ensure the new configuration is properly loaded.
Following these steps should fix any issues related to loading startup scripts in 3ds Max.
- Check for Hidden Directories:
Problems with installation or reading/writing setting for plugins or scripts
Issue:
When you start a plugin/script or run an installer, an error message references a Temp/User account folder on your machine.Applicable to any script/plugin.
Additional information:
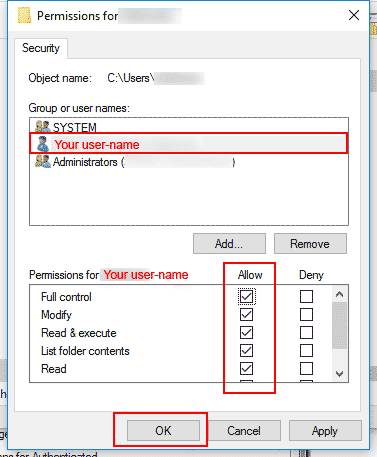
By default user must have permissions to read/write to directory %USERPROFILE% (“C:\Users\USERNAME”) but sometime this permission can be changed.
As a result, the user receives an errors when try install new plugins/scripts, or when try to use them.Solution:
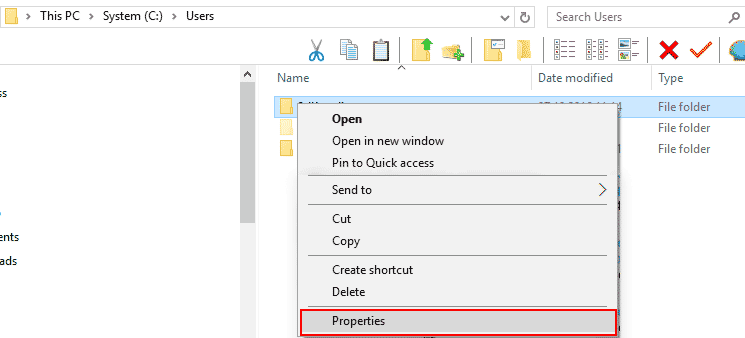
- Open the Windows Explorer and navigate to directory “C:\Users\”
- Choose a directory of your current user
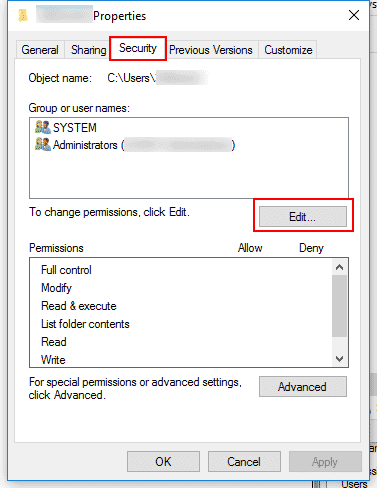
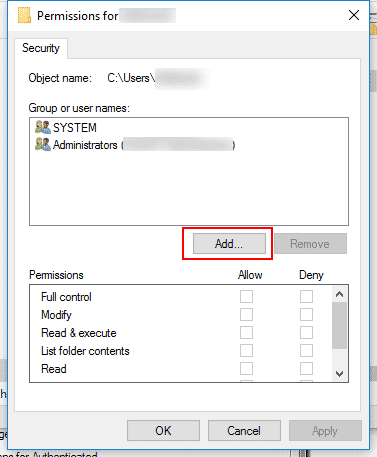
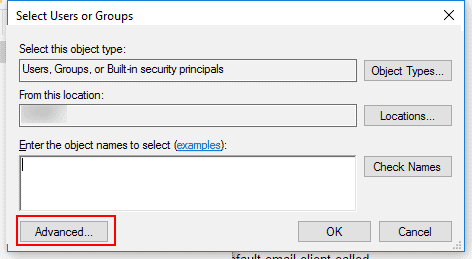
- Choose the menu item “Properties” from explorer menu.
- Go to “Security” tab and set permission for your user like on pictures below

Properties User Properties Add Permissions Add Permissions Add User Apply permissions Related links:
Windows 10 troubleshooting (Permissions Issues section).How to fix: Unable to create copy/move destination directory
You repeatedly receive a MAXScript Garbage Collection Error
Issue:
When running a script you repeatedly receive a MAXScript Garbage Collection error.
Solution:
Open the “Preferences” dialog and change a value for “Initial heap allocation” to 256 or 512.
Restart the 3Ds Max.
See another solution here:
3ds max Maxscript Heap Memory Allocation

Scene file crashes, corrupts scene data, gives Script Controller error or no longer uses the Undo function
Issue:
When opening or working with an Autodesk®3ds Max® software file (*.max), the scene displays some or all of the following behaviors:
- Crashes or fails to open
- Corrupted scene data
- Empty helper nodes
- Unable to save the scene manually
- Unable to use the Undo function
- Displays various MAXScript errors
- Corrupts or removes cameras, lights, and/or materials
- Forces an auto-save after breaking the scene or when choosing “Don’t Save” when closing
- Adds itself to an existing script in the MAXscript startup directory
- Force closes 3ds Max
- Unable to save V-Ray lights
Read original article about issue and solution on Autodesk Knowledge Network.
Solution:
Install and use the 3ds Max Security Tools from Autodesk, Inc.
3ds Max Security Tools protects you from CRP, ADSL and ALC 3rd party scripts, which can corrupt the 3ds Max environment, cause data loss and instability, as well as spread to other systems.
3ds Max Security Tools can safely remove corruption-causing scripts from your system, including any infected scene files.
The cleaning process is non-destructive and does not affect any scene data.
The Security Tools detect and remove the scripts when 3ds Max starts, as well as when a scene is loaded or saved, including when the scene is merged or XRefed.
The Security Tools will protect and clean systems that are already infected, and allow you to safely use scene files shared from other machines.


Team Setup & Shared Database:
How many users can one MySQL/MariaDB database handle?
For Project Manager’s metadata, this is not a concern.
A small studio of 5–20 artists and a large company with thousands of users are both trivial for MySQL/MariaDB on ordinary hardware — these engines routinely run far heavier workloads.
You will not outgrow it.Applicable to Project Manager running on a shared MySQL/MariaDB database (multi-user/team setup)
Can I install the database on a NAS (Synology, QNAP)?
Yes, many studios do.
The catch: the MySQL/MariaDB package on older NAS models is often outdated.
If the NAS database version is older than Project Manager requires (Preferences → Database tab),
it won’t work — update the NAS OS or install a newer database package via your device’s package centre.Applicable to Project Manager running on a shared MySQL/MariaDB database (multi-user/team setup)
“Test Connection” fails. What do I check?
- IP address — from another machine,
127.0.0.1won’t work; use the server’s LAN IP. - Firewall — is the inbound rule for port 3306 active on the server?
- Login/password — a typo when creating the account?
- MySQL 8+ authentication — see Section 5; use
mysql_native_password.
Applicable to Project Manager running on a shared MySQL/MariaDB database (multi-user/team setup)
- IP address — from another machine,
Connection works, but Project Manager reports missing tables, or tags don’t save.
The account is missing schema-creation rights. Project Manager creates its tables on first launch and needs full privileges to do so — confirm
CREATE TABLESPACEis granted (Section 4).Applicable to Project Manager running on a shared MySQL/MariaDB database (multi-user/team setup)
One artist added models, another can’t see them
Project Manager normally tracks changes and refreshes folders automatically, so this is usually a quick fix rather than a real problem.
First, confirm both machines point to the shared database, not the local one (Preferences → Database tab on each).
If a change still hasn’t appeared, manually refresh the current folder (right-click in empty space → refresh) to force an update.
Also, confirm the files themselves are on a shared network path both artists can reach; the database stores the organisation, not the files.Applicable to Project Manager running on a shared MySQL/MariaDB database (multi-user/team setup)
Can’t we just put the local SQLite file on a shared network folder?
This is the one shortcut that genuinely doesn’t work reliably. SQLite is excellent for local, single-user workflows, but it is not designed for concurrent multi-user writes over a network share — file-locking behaviour over SMB/NAS leads to errors, lost changes, or a corrupted file.
It’s a known limitation of network filesystem semantics, not something Project Manager can work around.
For real teamwork, use a database server (MySQL or MariaDB) — which is what this guide sets up.Do we need a separate database account for each artist?
For a small studio, no — one shared account is the simplest, most reliable setup, and a database server is built to handle many connections under one login.
What actually matters is that the account has full privileges (Section 4).
Studios with stricter security policy can use per-user accounts; see the advanced note in Section 4.


Did not find the answer to your question?
Didn’t find an answer? Ask on the Forum or contact our support directly
Search On Site:

