Translate
- Download the archive with the plugin
- Unpack the archive
- Open 3ds Max application
- To install an MZP file in 3ds Max, you can use one of the following methods
- Drag and Drop Method:
- – Simply drag the MZP file from your file explorer and drop it into the 3ds Max viewport.
- Using Menu:
- – Go to the “Scripting” menu and select “Run Script.”
- – Navigate to the location of your MZP file, select it, and press “Open.”
- The installation will be automatically started
- Follow the instructions on the screen to complete the installation
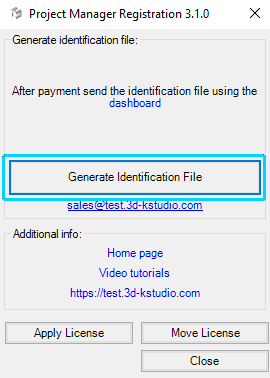
- Generate the identification file, if you are the official client and you need a new license
- In the 3ds max menu “Customize”>> “Customize User Interface”>> Category “Kstudio” choose the plugin and drag it to the Panel of the Instruments
- Install the “Fusion“, “Sweep PRO” or free version of the plugin “Sweep Profile“
- Unpack the archive with Mouldings.zip
- Drag the “Install Sweep-Profile Shapes.mzp” into the 3ds Max viewport
- Start the plugin (Fusion or Sweep Pro) and choose the directory with shapes on the top list of the plugin
- By default mouldings are installed by path “%localappdata%/Kstudio/Sweep-Profile Shapes/”
You must be logged in to download the full version.
* Applicable to official customers only
Run the 3ds Max
Choose the menu-item “Activation” from the main 3ds Max menu “Project Manager” or from the plugin menu “Help”

Select the most suitable activation type
- Run the 3ds Max
- Run Sweep PRO plugin
- An activation dialog will appear
Select the most suitable activation type
- Run the 3ds Max
- Create the Fusion/Spline Flow/…/Add the Modifier..
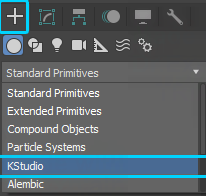
- To create an object, choose the Kstudio Category in the Create section on the Command Panel

- Create the object in the viewport and switch to the Modify tab
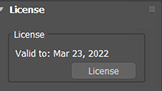
- Open the License rollout at the bottom and press the button License

- An activation dialog will appear
Select the most suitable activation type
Insert the activation key received in the confirmation email and click the “Apply” button.
You can always check and manage your activation keys in your dashboard.
If you move to a new computer or reinstall Windows, simply re-activate using the same key — no need to request a new one.
Each activation key can be used on one or several devices (depending on your license type).
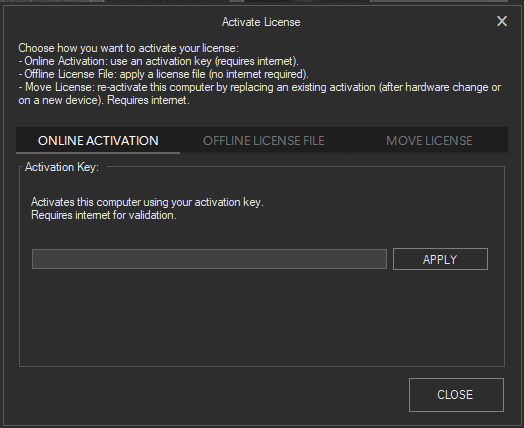
This feature is currently available for Project Manager, Models Manager, Materials Manager, Batch Render&Relink, FilePathFinder, and Sweep PRO.
Soon it will also be extended to other plugins.
Internet connection is required for activation and occasional validation.
Note: By default, the online license is activated for all new purchases.
If you are still using the old (offline) license type, you can easily switch to the online license in your dashboard.
This significantly simplifies license management, especially for teams.
Insert the activation key received in the letter and click the button “Apply License”
Note: Internet connection is required to use activation keys
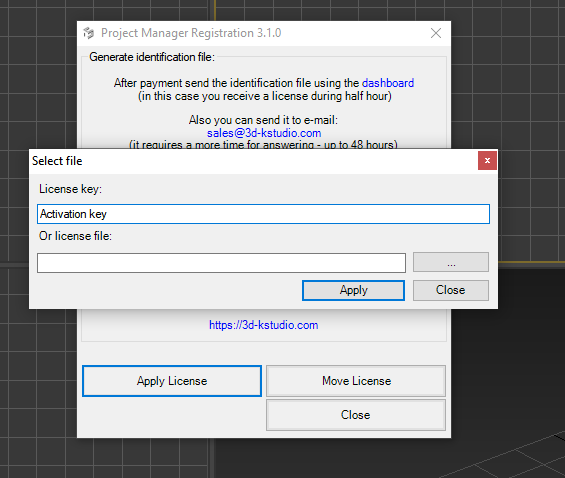
If you have a problem with this activation type, use the second method – using identification file
You can use a single identification file to obtain licenses for various plugins.
For instance, you can generate an identification file for Sweep PRO and use it also in the slot for generating a license for Spline Flow
1. Press the button “Generate identification file”
2. Login to dashboard using the same email you used for purchase
3. Upload the identification file, generated in the previous step, by pressing the “Choose File” button
4. Press the button “Send”
5. Download the license key from the dashboard.
Also, you will receive a copy of your license key to an email-box

6. Press the button “Apply License” and choose the downloaded license key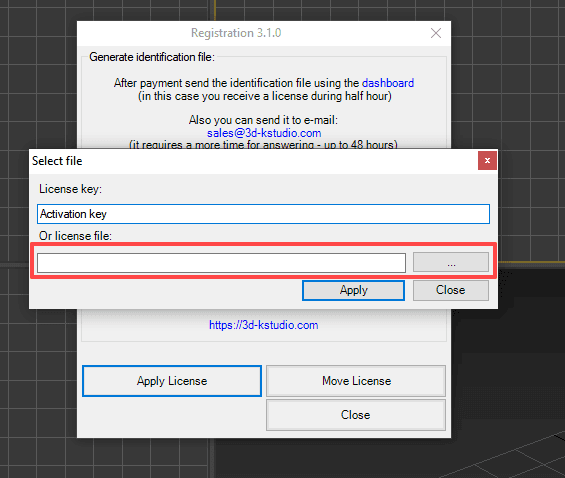
Kstudio plugins are used by freelancers as well as in studios of different sizes – from several employees to hundreds.
This feature simplifies the deployment of numerous installations into a large network.
This instruction applicable only for Project Manager
I recommend paying attention to utilities such as PsExec and PowerShell – with their help you can install the 3dsMax plug-ins and apply the license keys in a batch mode.
Using:
- Download and extract the archive SilentModeInstall.zip
- Copy the ZIP archive with the full version of the plugin into one folder with “AutoInstallStart.bat”
- Open “AutoInstallStart.bat” and uncomment/add a valid path to 3dsMax.exe
- Write activation keys to the file “ActivationActivationKeys.txt”
- Run “AutoInstallStart.bat” using PsExec/PowerShell or manually on each computer
How to Distinguish Between the Full and the Demo Version You Downloaded and Installed?
Before activation, do not forget to install the full version of the plugin
(the title shouldn’t contain the word Demo)
To determine if you have downloaded and installed the full version or the demo version, here are some key points to consider:
1. Activation: The demo version cannot be activated. If you have downloaded the demo version, activation will not be possible.
2. File Name: The archive containing the demo version will include the word “Demo” in its name.
3. Installation and Launch: During installation or when launching the plugin, the demo version will display the word “Demo” next to the logo.
4. Full Version: If there is no “Demo” label on the logo, but you see the “Demo” label over files, it means you have the full version which requires a license key for activation.


Note: Please use the latest updates for your version of 3ds Max
3ds Max Updates & Service Packs
See Also:
- How to update or transfer the license to another computer?
- Troubleshooting License Application Issues