Translate
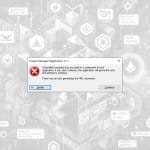
Issue:
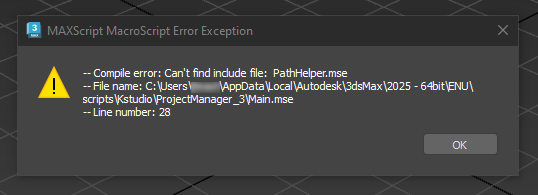
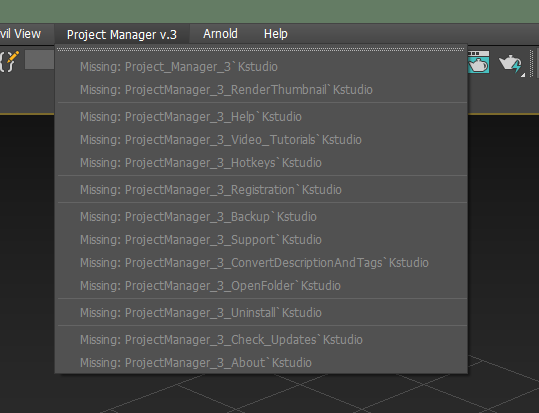
If you’re encountering a situation where the Project Manager (or other plugin) is not appearing in the menu, or you receive the error message “Can’t find include file: SomeFile.ms…”, this is likely due to hidden or system file attributes in your 3ds Max installation.
Cause:
Starting with 3ds Max 2021 Update 3, Autodesk made changes to how scripts are loaded. Scripts or files with the “hidden” or “system” attribute are no longer loaded at startup. This means if any folder or script file associated with your Project Manager plugin has these attributes, 3ds Max will ignore them, leading to errors or missing features.
SOLUTION 1
- Check for Hidden Directories:
- Navigate to the directory
%localappdata%\Autodeskor its subdirectories. - Check if any folder is marked as “hidden.” Sometimes, Windows or certain software may mark these directories as hidden without your knowledge.
- Navigate to the directory
- Unhide the Folder:
- Right-click the directory or file, select Properties, and ensure the “Hidden” attribute is unchecked.
- Apply the changes to all subfolders and files if prompted.
- Restart 3ds Max:
- After unchecking the hidden attribute, restart 3ds Max, and the Project Manager should now load correctly without errors.
Additional Tip:
To avoid this issue in the future, regularly check your directories if you notice any unusual behavior in 3ds Max, especially after updates. Hidden or system attributes can sometimes be applied automatically, but they can be manually removed following the steps above.
For more details, refer to Autodesk’s official forum post on this subject: Maxscripts Not Loading at Startup.
Here are a few simple methods to find and remove the “hidden” attribute from a folder using Windows Explorer or the Command Prompt:
Method 1: Using Windows Explorer
- Open Windows Explorer and navigate to the folder
%localappdata%\Autodesk(or the folder where your plugin is stored). - In the top menu, click View.
- Check the box next to Hidden items. This will allow you to see all hidden folders and files.
- Now, you’ll see any hidden items, which appear slightly transparent.
- To remove the “hidden” attribute:
- Right-click on the hidden folder or file.
- Select Properties.
- In the bottom section, under Attributes, uncheck the Hidden box.
- Click OK to apply the changes.
Method 2: Using Command Prompt
Open Command Prompt as an administrator.
- Navigate to the directory where you want to remove the “hidden” attribute. For example, if you’re targeting the
%localappdata%\Autodeskfolder, enter:cd %localappdata%\Autodesk
- To recursively remove the “hidden” attribute from all files and folders, use this command:
attrib -h /s /d
- Navigate to the directory where you want to remove the “hidden” attribute. For example, if you’re targeting the
Explanation:
-h: Removes the “hidden” attribute./s: Applies the command to all files in the current directory and subdirectories./d: Applies the command to directories as well as files.
This will remove the “hidden” attribute from all files and folders in the directory you specified, including subdirectories.
Method 3: Using PowerShell
Open PowerShell as an administrator.
To search for hidden folders in
%localappdata%\Autodesk, run this command:Get-ChildItem -Path "$env:localappdata\Autodesk" -Recurse -Force | Where-Object { $_.Attributes -match 'Hidden' }To remove the “hidden” attribute from a specific folder or file, use:
Get-ChildItem "C:\Path\To\Your\Folder"  -Recurse -Force | ForEach-Object {
    if ($_.Attributes -band [System.IO.FileAttributes]::Hidden) {
        $_.Attributes = $_.Attributes -bxor [System.IO.FileAttributes]::Hidden
    }
}
These methods will help you quickly find and remove the “hidden” attribute from any folder or file.
SOLUTION 2
Locate the ENU Folder:
- The ENU folder is a specific directory in your 3ds Max installation path. This is where user-specific settings, scripts, and macros are stored. You can typically find it here:
C:\Users\[YourUsername]\AppData\Local\Autodesk\3dsMax\[YourVersion]\ENU- Replace
[YourUsername]with your actual Windows username and[YourVersion]with the version of 3ds Max you are using.
- The ENU folder is a specific directory in your 3ds Max installation path. This is where user-specific settings, scripts, and macros are stored. You can typically find it here:
Copy the “scripts” Folder:
- Inside the ENU folder, locate the
scriptsdirectory. This folder contains all custom scripts you have installed or created in 3ds Max. - Copy the entire
scriptsfolder. - Navigate to a new location on your computer where you want to store it, such as
Documentsor any other easily accessible folder. For instance, you can paste the copied folder here:C:\Users\[YourUsername]\Documents\3ds Max [version]\
- Inside the ENU folder, locate the
Relink “Additional Scripts” and “Additional Startup Scripts”:
- Open 3ds Max.
- Go to the Customize menu and select Configure User Paths.
- In the dialog that opens, click on the Scripts tab. Here, you will find options for both Additional Scripts and Additional Startup Scripts.
- Click on the Browse button next to Additional Scripts and relink it to the
scriptsfolder you just copied to your new location (for example,Documents\3ds Max [version]\scripts). - Repeat this step for Additional Startup Scripts, making sure it also points to the same copied
scriptsfolder.
Save and Restart:
- After relinking both paths, press OK to apply the changes. It’s a good idea to restart 3ds Max to ensure the new configuration is properly loaded.
Following these steps should fix any issues related to loading startup scripts in 3ds Max.